
Discover easy-to-follow steps to overcome Notion’s 1500 block storage limit. Learn how to manage your workspace to free up block storage and enjoy limitless productivity.
We’ve all been there—just when you’re on a productivity roll, organizing your life or your latest project in Notion, you hit the dreaded 1500 block storage limit. Frustrating, isn’t it?
This workspace has used 1500 of its 1500 block storage limit (100%).
You’re left wondering what to do next, how to continue your organizational spree without hitting a wall.
This 1500 block limit might seem like a hindrance, but there are ways to bypass it and get back to unlimited blocks. This article walks you through these straightforward solutions so you can maximize your use of Notion.
Whether you’re a beginner, an intermediate user, or a Notion expert, you’ll find this guide helpful.
Understanding Blocks in Notion
Before we delve into the solutions, let’s understand what blocks in Notion are.
In simple terms, a block in Notion refers to a unit of information. It could be as small as a line of text or as big as a table. Blocks are the fundamental building blocks—no pun intended—of any Notion page.
Why 1500 Blocks?
Why does Notion impose this limit in the first place? Notion has this restriction to manage server load, especially for free users. If you’re part of a workspace, the block limit applies to the entire workspace and not just your individual use.
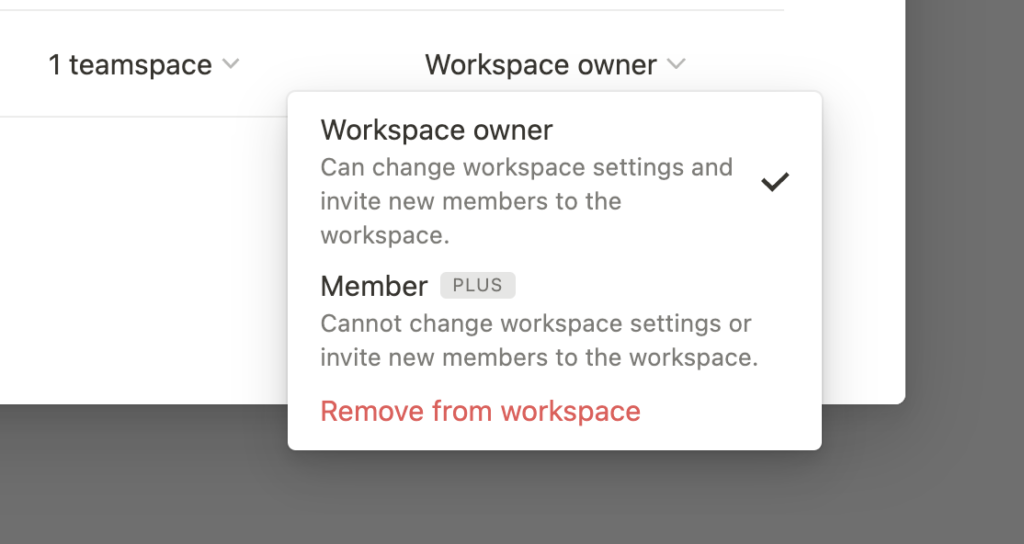
Solution 1: Removing a Member From Your Workspace
The 1500 block limit often kicks in when you add someone to your workspace. If this happens, removing that person can lift the restriction.
Steps to remove a member:
- Go to Notion’s Settings.
- Click on Members.
- Locate the member you wish to remove.
- Select the member and click Remove from Workspace.
Voila! You should have your unlimited blocks back.
What If I Need That Member?
If you need to collaborate with the removed member, consider sharing specific pages with them instead of adding them to the entire workspace.
Solution 2: Opt for a Paid Plan
The most straightforward way to overcome this limit is to opt for a paid plan. Notion offers several subscription options that provide benefits beyond just lifting the 1500 block limit.
Subscription options:
- Personal Pro: Unlimited blocks for an individual.
- Team: Unlimited blocks with added collaboration features.
- Enterprise: Tailored solutions for large organizations.
You can check out these plans on Notion’s Pricing page.
Solution 3: Clearing Space—What Doesn’t Work
You might think that removing pages from the Trash would free up blocks, but unfortunately, this isn’t the case. The Trash folder is separate and doesn’t count toward your block limit.
Planning Your Workspace Efficiently
If you’re looking to make the most of the free plan, consider restructuring your workspace to minimize the number of blocks used. For example, instead of creating multiple text blocks, combine them into one.
Additional Tips
- Track Your Usage: Keep an eye on the block counter at the bottom of your workspace to avoid hitting the limit unexpectedly.
- Bulk Actions: Use bulk actions to move, delete, or archive blocks in one go.
Conclusion:
Hitting the 1500 block storage limit on Notion can be a real setback when you’re knee-deep in organizing your life or business projects. However, the ways to overcome this obstacle are easier than you might think. By either removing a member from your workspace or upgrading to a paid plan, you can enjoy unlimited block storage.
This guide aims to provide you with the most effective and straightforward solutions, making your experience with Notion seamless and enjoyable. So go ahead, take control of your Notion workspace, and let the productivity roll in!
Note: The information provided is accurate as of the last update in January 2022 and is subject to change. For the most current information, visit Notion’s official website.